Showing posts with label tally. Show all posts

Monday, May 14, 2012

Account Payable & Receivable Reports

The accounts payable report provides detail of the money owed by the business in due format. The total amount owed per supplier  per invoice is provided. Also, you can set aging in report like amount to be paid in next 0-30 days, 30-60 days etc.

The accounts receivable report gives you a detailed listing of the balance due over customer per invoice. This helps company follow customer for pending payment against specific invoices.

To check these report in erpnext, go to:

Account >> Report >> Account payable / receivable reports


What are filters for?

Using date and accounts filter you can filter invoice made between specified time for particular customer / supplier.


-- For more queries, write us on support@erpnext.com --

Monday, January 30, 2012

How to Use Tax Inclusive Rate Functionality in ERPNext?

Tax inclusive rate functionality allows user to enter tax inclusive rate  items rate table.

As per the standard, user has to enter items rate before tax in pricelist which is fetched in items ref rate.


But for company into retail business, users only know tax inclusive rate of an item. They can use this feature which will back calculate tax and ref rate for them.


To back calculate taxes from tax inclusive rate, you will need to:

1. Mention taxes applicable on item level.
2. Tax inclusive rate in rate / basic rate column on item level.
3. Mention all the possible tax ledgers in tax table and check mark "include in print rate".


P.S.:

When need to calculate discount:

When need to offer discount to customer, mention tax inclusive rate in ref rate instead of basic rate.

Sunday, January 22, 2012

How to Make BOM (Bill of Material)?


Bill of material is list of raw material and operations through which raw material is processed in process of getting converted into finished good.

So bill of material in made for finished good and sub-assembly (for which separate production order is raised).

For making bill of material for an item, there are pre-requisites.
1. It should be stock item.
2. In item master, following production related values should be selected.
     > Allow bill of material - Yes
     > Allow production order - Yes


To make BOM, go to:

Module >> Production  >> Bill of Material >> New Bill of material


Bill of material form for separate tab for finished goods details, operations and finally materials detail.


Basic item detail:

It will list production item for which bill of material is made. BOM for will raw material required for making quantity mentioned in field above.

If default UOM checked, it will be updated in item master also.

BOM operations detail:


Operations table will list work stations in which your raw material will be processed and convert into finished good.

Operations operating cost will be considered in valuation of BOM also.

To make new work station, go to:

Production >> Work station >> New work station

BOM Material list:


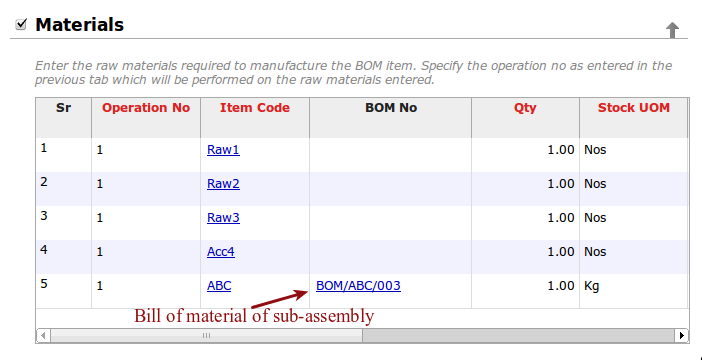
It's a list of raw material which will be consumed in production to give finished good. It will list direct raw-materials and sub-assemblies for which separate bom is made. If company does not raise separate bom for sub-assembly item, you can list all the raw material required for sub-assembly in material table itself.

Costing:

Based on operations cost and raw materials rate system will give you bom valuation.


After entering all the detail save and submit this BOM. Only submitted bom will be available for selection in production order.

Tuesday, December 20, 2011

Recurring Sales Invoice

Recurring sales invoice is a tool which will re-generate selected invoice automatically and e-mail to selected recipients.

This feature will work for company who raises invoice of same amount to customer in predefined span of time. This scenario is observed followed in business which sell items on lease or loan.

How to enable recurring invoice?

To enable recurring invoice feature in your account, go to:

Setup  >> System >> Feature Setup


How to make invoice recurring?

Once recurring invoice is enabled in feature setup, you will find separate tab of recurring invoice in submitted sales invoices.


Invoice will become recurring once "convert to recurring invoice" field is checked. On checking stated field, few more field will be made visible when user can set property based on which selected invoice will be created in system.


Repeat on day on month:
Considering above screenshot, selected invoice will be re-generated in system on 12th of every month till "convert to recurring invoice" is unchecked or end date arrives.

End date:
Date on which recurring invoice generation will stop.

Notification e-mail address:
E-mail notification of auto-generated invoice will be sent to  email id's mentioned in notification address field. Customer contact selected above will be pulled automatically in notification field.

Tuesday, December 13, 2011

Customize Form View

Let us understand the ERPNext architecture before we venture to learn form customization tool.

ERPNext is built over WNframework. In this framework, each form is created as a table in the backend. Each table has field and properties are assigned to each field.

Like Sales order is a table, in which sales order fields are defined in rows as "Sales order series" and "customer name". Each of these field has properties like "label", "mandatory", "print hide" etc.

Sales order table:

Field label Mandatory Print Hide In Filter
Sales order Series Series (Check box) (Check box) (Check box)
Customer Name Customer (Check box) (Check box) (Check box)

To store more details of sales order like item detail, we have separate table called "sales order item" table. Likewise, taxes are the separate table in sales order. So, for sales order form, sales order table becomes parent and sales order item, taxes and sales person becomes child table.

Please find below the table structure of each form type.
Transaction Table Table Name
Quotation Quotation Quotation

Quotation item table Quotation Item
Sales Order Sales order Sales Order

Sales order item table Sales Order Item
Delivery Note Delivery note Delivery Note

Delivery note item table Delivery Note Item
Sales Invoice sales invoice Sales Invoice

Sales invoice item table
Sales Invoice Item

Sales invoice tax table Sales Taxes and Charges
Purchase Order Purchase order Purchase Order

Purchase order item table
Purchase Order Item
Purchase Receipt Purchase receipt Purchase Receipt

Purchase receipt item table Purchase Receipt Item
Purchase Invoice Purchase invoice Purchase Invoice

Purchase invoice item table
Purchase Invoice Item

Purchase invoice tax table Purchase Taxes and Charges
Journal Voucher Journal voucher Journal Voucher

Journal voucher item table Journal Voucher Detail

With this, lets dive into the form customization tool. "Customize form view" is the tool which allows us to select a table and modify fields property as per your requirement.
You can find customize form view by going to:
Modules --> Setup --> Customize form view


Lets' say I want to make item code field mandatory in sales invoice - item table. What will I select in form type?

1. Form type - RV detail (refer to above table for clarification)
2. Selecting form will pull columns of invoice item table (as row here)
3. To make item code mandatory, select check req. for item code and update.
You will need to do clear cache (from tools --> clear cache) and browser refresh to see the effect in the form.


Please refer to table below to learn about field property.

Field property Purpose Field Type
Allow on submit Lets user update value in field even after submission. Check box
Default Value defined in default will be pulled on new record creation Text box
Description Gives field description for user understanding Text box
Hidden Will hide field in form Check box
In Filter Will add this field in report Check box
Label Label is the name defined for field which appears in form Text box
Options Make field drop down selecting Text box
Print hide Will hide this field in print Check box
Reqd (Required) Will make that field mandatory Check box

Tuesday, December 6, 2011

How to Interact With Cutomers Using Support Ticket?

Support ticket helps you automated tracking customer issues which are received in email. If support ticket configured, it will pull mail received on particular email id and create a support ticket in erpnext account.

Each support ticket is assigned a unique no. which is also sent to customer in auto-reply to his query. This helps customer too in following up with you by indicating support ticket no.

Support ticket can be:
  1. Allocated to support personnel
  2. Replied via system itself and track complete email communication over a ticket.
  3. Tracked by status. Tickets which are pending for response is set as "Open". Tickets which are replied is set as "Waiting for Customer". Tickets which are closed is set as "Closed".
Who can access support ticket?
User will need role of "Support team" for accessing support ticket.

Please follow the steps mentioned below to configure support ticket.


In email setting, you will find two options:

1. Out-going mail setting
2. Support ticket mail setting


Once this setting is done correctly, email received on id mentioned here will be pulled into system and there will be support ticket created with unique id and status as open till support executive replies to it.


Status is also assigned as a tag to ticket. You can filer ticket based on status, allocate to support people. Then support staff can filter support ticket allocated to them.

Thursday, November 17, 2011

How ERPNext Help in Decision Making?

ERPNext is a application which not only facilities creation and retrieval of transactions, but it also provide a tool (a report) which lets management pull data from transactions and try different permutation and combination in report for analysis purpose.

Selling >> Trend Analyzer


Using trend analyzer, one can run report on different transactions like sales order, delivery note, invoices, purchase order and GRN.

These transactions contain masters like customers, suppliers, items, territories. Trend analyzer allows you do run report on transactions based on masters and time period.


As mentioned above, trend analyzer report pull data from transactions like:
  • Quotation
  • Sales order
  • Delivery note
  • Sales invoice
  • Purchase order
  • Purchase Receipt (GRN)
  • Purchase invoice
Report can be ran based on masters:
  • Customer 
  • Customer group
  • Supplier
  • Supplier type
  • Item
  • Item group
  • Project
  • Territory
Below is the sample report ran for delivery note, based on item:


With the above data, you can do an analysis, which item was delivered the most in specific time period (which can be  month, quarter, half year or year).

Likewise, considering all the permutation and combination, one can run upto 500+ reports from the trend analyzer alone.

Friday, September 30, 2011

How to Create a Salary Voucher in ERPNext ?

There are two ways for creating salary slip.

  1. Create salary slip for all the employees at once. To learn more about it, click here
  2. Create salary slip individually for all the employees.
To create salary slip for employees one by one, follow the steps mentioned below:

1. Open salary slip:


2. Select employee in salary slip. There are three tabs in salary slip:
  • Basic info
  • Earning and deduction
  • Totals
As soon as you select salary slip, info (like earning and deduction details, name, designation, department) will be pulled from employees salary structure.

Also days attended in selected month will be calculated based on leave transactions made (and not on based of attendance record made) for that employee in that particular month.

Salary Slip


Earning and deduction detail:
As mentioned above, earning detail pulls data from salary detail where employees earning and deduction heads are mentioned. But while making salary slip, earning and deduction heads need to be defined based on:

1. LWP (leaves without payment taken by employee in a month)
2. Over time
3. Allowance (which are on actual) etc..

That's why, their is an add of column called modified amount where amount which employee is entitled to is entered.


Checking LWP will affect amount (and give you modified amount) based on leave application made for LWP for that employee is a month. User can add amount for heads like overtime or allowance manually in earning and deduction head.

3. Total:
Add arrear amount and leave encashment if any. Save and submit.


How to over-write records?

All the master which are imported from import data wizard can be over-written also. Lets consider a situation to understand how over-writing works.

I need to change the Default Warehouse for few items.
  1. Download template for importing item master for import data wizard.
  2. Check "Download with data" .
  3. Keep only 3 columns. ID, Item code (primary field) and Default Reserved Warehouse in spreadsheet.
    Note: ID is only required when over-writing data. ID will be same as Item Code.


4.  Put data and then save file in .csv format
5.  In import data wizard, check field: Over-write records with same name?
6.  Browse file the import


Friday, September 16, 2011

Feature Setup

Feature setup lets system manager select feature based on its companies operation. Like if company is not into import and export, then unchecking that will hide fields related to import / export feature. This will make ERPNext account more suitable to your business needs.

How to go to feature setup?


There are four sections in feature setup:
  1. Material
  2. Selling
  3. Production
  4. Miscellaneous 
Material modules feature setup:


  1. Item Serial No.
    Checking item serial no. will make serial no. field visible in item master. Also stock ledger entries will happen based serial no. entered in sales and purchase transactions.
  2. Item Batch No.
    It will make batch no. field visible in item master. And it will also keep a check of whether you are entering batch no. or not while sales and purchases.

  3. Brands
    This will let you maintain brand master and select brand for each item. It will also enable brand wise items sales / purchase report. Unchecking brands will simple hide option of brands from setup and item master.

  4. Item Advance
    It will let you maintain item codes (item name) given by your customer. It will help you pull your items in sales transactions based on customers item code mentioned in purchase order. If you don't want to track your customers item code, then uncheck Item advance.

  5. Sales BOM
    Sales BOM is a form where you can list main item which you deal in and other accessories which are supplied with that main item. Consider cell phones, handset is main item while charger, ear phone, CD makes a complete package. If you are not dealing in such product, uncheck.

  6. Item Group
    Is feature which enable user to define categories of item he is dealing in. These categories will be selected for each of the item. It will also give item group wise sales and purchase report. Suggested!
Selling module feature setup:
  1. ERPNext also handle transactions when you are dealing you foreigner customer / supplier.
    checking export / import feature allows user to select currency other than his default. If you are not dealing with party outside your home country, you can uncheck it.
  2. Discount
    Checking for this feature will enable discount offering feature in your sales cycle (sales order, delivery note, sales invoice). If you are not offering discount to your customer, then please uncheck it. Suggested!

  3. Projects
    Its for the company which needs to track project wise sales and purchases.

  4. Sales Extra
    This will activate sales partners / sales person master, allow there selection in sales transactions and also generate a report (sales partner wise commission, sales person wise target variance report, sales person wise sales booked) based on transactions they are tagged in.
Production module feature setup:

  1. Manufacturing
    Check only if you are into manufacturing business. This will let you define bill of material for items, manage sub-contracting and raise production orders.

  2. Quality
    Quality feature lets you define inspection parameter for each of the item which will be used for sampling on receipt, delivery or production of item.

  3. Point of sales
    Only for the company into retail business. To learn more about point for sales feature, click here.
Miscellaneous:
  1. Page Break
    It will add column in item table of sales and purchase transactions. As name suggest on checking page break after any item will push rest of the detail on new page for printing. Suggested!

  2. More Info
    More info gives you information about transaction creator and modifier with date and time. Suggested!

Monday, September 12, 2011

How to Generate Salary Slips in ERPNext ?

There are two possible ways to making salary slip for empoyees:

1. Indiviual salary slip from employees salary structure
2. Salary manager

Since salary structure of all the employees are pulled from salary structure which remains standard over a period, ERPNext offer feature to generate salary slip in bulk, based on

  1. Company
  2. Employees 
  3. Department
  4. Branch
  5. Designation
  6. Employment type
  7. Grade
Following are the steps to be followed for creating salary slip from salary manager:
1. Go to HR --> Tools --> Salary Manager


Select Company and other parameters based on which you want to generate salary slip:


Create salary slip:
Create salary slip will effect into drafting of salary slip (in editable form). Draft form will allow you to edit salary slip (to add overtime or reduce deduction etc..)

Submit salary slip:
It will submit all the salary slips created.

Make JV (accounting entry):
Will take you to general voucher for accounts entry posting.

Tuesday, March 29, 2011

ERPNext Help (Blogs)


  1. How to upload letterhead?
  2. How to add users and assign roles?
  3. How to manage customers and contacts?
  4. How to manage suppliers and contacts?
  5. How to create warehouse?
  6. How to create items?
  7. How to import masters using csv file?
  8. How to upload price list?
  9. How to upload opening inventory?
  10. How to manage chart of accounts?
  11. How to create opening accounting entries?
  12. How to create templates for terms and conditions?
  13. How to create templates for taxes and other charges for sales transactions?
  14. How to create templates for taxes and other charges for purchase transactions?
  15. How to create/add/edit naming series for transactions?
  16. How can user change his password?
  17. How to restrict user to particular pc or timelimit?


2. Selling Module

  1. How to manage customers and contacts?
  2. How to upload price list?
  3. How to create templates for taxes and other charges for sales transactions? 
  4. How to create leads?
  5. How to create enquiries?
  6. How to create quotations?
  7. How to create sales orders?
  8. How to create sales invoice
  9. How to carry out point of sales transactions?
  10. How to manage sales return?


3. Buying Module

  1. How to create suppliers and contacts?
  2. How to create templates for taxes and other charges for purchase transactions?
  3. How to create indents?
  4. How to create purchase orders?
  5. How to create purchase invoice?
  6. How to manage purchase return? 
  7. How to manage sub-contracting?


4. Stock Module

  1. How to create warehouse? 
  2. How to create item groups?
  3. How to create items?
  4. How to import masters using csv file?
  5. How to perform stock reconciliation or opening stock entry?
  6. How to create purchase receipts?
  7. How to classify an item a sales and/or service item?
  8. How to create delivery notes?
  9. How to configure purchase settings in item master
  10. How to configure inventory details of item master?
  11. How to account for landing costs for purchase items after the purchase invoice is generated? 
  12. How to check your stock levels?


5. Accounting Module

  1. How to manage chart of accounts?
  2. How to create opening accounting entries?
  3. How to create a purchase invoice?
  4. How to make expense entries in accounts?
  5. How to create sales invoice from sales order?
  6. How to accept payment against a sales invoice?
  7. How to accept advance payment from a customer?
  8. How to create credit note?
  9. How to create debit note?


    6. HR Module

    1. How to create employee master?
    2. How to create attendance records?
    3. How to upload attendance records using csv files?
    4. How to create salary slip?
    5. How to create earning types for slary structure?
    6. How to create deduction type for slary structure?
    7. How to create salary structure for an employee?
    8. How to generate salary slip for all the employee?

    For any further help please email to support@erpnext.com or

    visit ERPNext user forum

    For free trial registration visit ERPNext.com

    Cheers
    Team ERPNext

      Tuesday, March 15, 2011

      How to Create Salary Structure in ERPNext?

      Salary structure will be created for each employee in the company. Salary structure is where employee's earnings and deductions are defined.

      To create new salary structure, go to:
      HR --> Salary structure --> New Salary structure.
      Click on "New salary structure"


      Step 1: Select an employee from employee master for whom you want to create the salary structure.


      Step 2: Mark status of an salary structure as "Yes" or "No".
      If marked Yes - System will consider that salary structure for processing salary slip of an employee
      If marked No - System wont consider that salary structure for processing salary slip.

      Also mention yearly package offered to employee in CTC (cost to company).

      Step 3:
      Earning and Deduction:
      All the earning and deduction heads created in your account will be pulled in salary structure.
      1. Keep only required earning and deduction head required for that employee.
      2. Mention amount in front of each earning and deduction type.
          Note: No need to mention income tax and leave deduction if creating IT checklist for the employee.
      3. LWP = Leave without pay
          Only earning head for whom "Depend on LWP" is marked will be affected when employee takes "leave
          without pay".


      Net Pay = total earning - total deduction

      Save the Salary Structure.


      Now you can create a Salary Slip and IT Checklist against this Salary Structure.


      For more details, please visit www.erpnext.com

      How to Create an Employee Master in ERPNext ?

      To create an employee master, follow steps as shown below


      The Basic Information will capture the name of the employee, status (Active /  Left), date of joining etc. Select the relevant Holiday List applicable to the Employee. If this Employee is taking leaves and a date mentioned in the holiday list falls in that period, that date would not be deducted from his leave balance.


      The Employee codes can be generated by either Naming Series followed by a system generated number or Employee Number.This setting can be done from Setup --> System --> Global Defaults --> HR.


      The tab for Job Profile will capture the branch, designation and department of the Employee. These details will be fetched from their respective masters.

      Salary related information will also be covered like the mode of salary payment which can be Bank, Cash or Cheque. If Bank, then mention the Bank Name and the Bank Account number of the employee.


      The Contact Details will have the phone number, email and address details of the employee.


      The Personal Details will capture family background, health and passport details.


      The Educational Qualification tab will capture the details qualifications acquired by the employee, the university and percentage of marks obtained.


      The Career History will capture details of work experience in previous companies as well as the current company.


      The Exit tab will be filled when the employee is leaving.


      You can attach the Employee's resume (CV) or Photo in the Attachments tab.


      Now save the Employee.


      For more details, please visit www.erpnext.com