
To create a Quotation in ERPNext follow the steps as shown below

The Basic Info tab will capture the Lead or Customer details to whom the quotation is to be sent for approval. Also you can mention the Enquiry No and fetch its details in the Quotation.

The Items tab will have a list of items and their rates to be proposed to the lead or customer. The Ref Rate will get fetched from the item master based on the Price List selected.


You can make changes in the Rate column. The discount figure will get calculated automatically on the Ref Rate. Mention the quantity of items. The total amount will get calculated based on the Rate and Quantity mentioned.

The Taxes tab will capture the total tax amount. If you have not created a tax template, enter taxes directly. You can select Type based on the following requirements :

The Terms tab will have the terms and conditions and other additional information which you would want to appear on the Quotation print format. You can even create a template pull its details.

The More Info tab will capture additional information about the quotation.


The Basic Info tab will capture the Lead or Customer details to whom the quotation is to be sent for approval. Also you can mention the Enquiry No and fetch its details in the Quotation.
The Items tab will have a list of items and their rates to be proposed to the lead or customer. The Ref Rate will get fetched from the item master based on the Price List selected.
You can make changes in the Rate column. The discount figure will get calculated automatically on the Ref Rate. Mention the quantity of items. The total amount will get calculated based on the Rate and Quantity mentioned.
The Taxes tab will capture the total tax amount. If you have not created a tax template, enter taxes directly. You can select Type based on the following requirements :
- Actual - when you know the actual amount of tax or other charge to be added to the net total, mention the amount in the Rate column.
- On Net Total - will be selected when a tax percentage has to be calculated on the net total.
- On Previous Row Amount - will be selected if a tax percentage needs to be calculated over the previous row tax amount . In this case mention the Row Id.
- On Previous Row Total - will be selected when a tax percentage needs to be calculated over the total of net total and the previous row tax amount. In this case also mention the Row Id
Select the relevant tax account head applicable. The account head should be created under Chart of Accounts. The tax rate will be mentioned in the account head and will get fetched under the Rate column on selecting the same.
Creating a tax template will save your time. To see how to create a tax template click on the link http://erpnext.blogspot.com/2011/02/how-to-create-template-for-taxes-and.html
The Terms tab will have the terms and conditions and other additional information which you would want to appear on the Quotation print format. You can even create a template pull its details.
The More Info tab will capture additional information about the quotation.
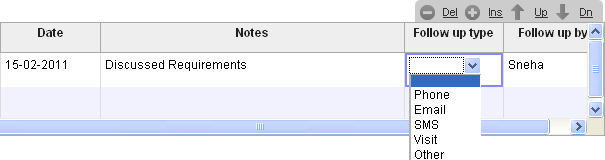
The Communication History tab will have information related to the sales person who has to follow up the lead or customer on some date to discuss anything. This information will appear on the sales person's home page as a calendar event on the follow up date. The table tab will record follow up history with the lead. The name of the sales person and the type of follow up will also be captured. You can later run a report on this table to see which sales person has followed up whom.
Save and submit the Quotation. Now you can email the quotation to the lead or customer.
After submitting the quotation, you can create a sales order once the order is confirmed.
For free trial, please visit www.erpnext.com
No comments:
Post a Comment