Sunday, January 22, 2012

How to Make BOM (Bill of Material)?


Bill of material is list of raw material and operations through which raw material is processed in process of getting converted into finished good.

So bill of material in made for finished good and sub-assembly (for which separate production order is raised).

For making bill of material for an item, there are pre-requisites.
1. It should be stock item.
2. In item master, following production related values should be selected.
     > Allow bill of material - Yes
     > Allow production order - Yes


To make BOM, go to:

Module >> Production  >> Bill of Material >> New Bill of material


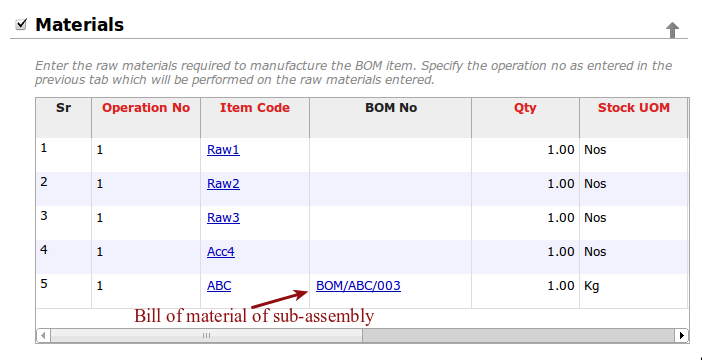
Bill of material form for separate tab for finished goods details, operations and finally materials detail.


Basic item detail:

It will list production item for which bill of material is made. BOM for will raw material required for making quantity mentioned in field above.

If default UOM checked, it will be updated in item master also.

BOM operations detail:


Operations table will list work stations in which your raw material will be processed and convert into finished good.

Operations operating cost will be considered in valuation of BOM also.

To make new work station, go to:

Production >> Work station >> New work station

BOM Material list:


It's a list of raw material which will be consumed in production to give finished good. It will list direct raw-materials and sub-assemblies for which separate bom is made. If company does not raise separate bom for sub-assembly item, you can list all the raw material required for sub-assembly in material table itself.

Costing:

Based on operations cost and raw materials rate system will give you bom valuation.


After entering all the detail save and submit this BOM. Only submitted bom will be available for selection in production order.

Tuesday, January 17, 2012

How to Create Item Groups?

Masters like item group, customer group, territory, sales person are in tree structure.

To create new item group, go to:

Module >> Stock >> Item group


To create new item group click on "New item group".


When click on new item group, it will ask for item group name and parent under which you want to create this item group.


Parent: Parent is the group under item group tree, under which "test item group" will be located.

What is the meaning of has child node?

Has child node field has two options, Yes or No. 

If "yes" selected for item group, it will be added as folder under item group. Item group with child no - yes will be able in parent field while creating item code.

If "no" selected for item group, it will be created as ledger and will be available for selection in item master.


You will be able to select item groups while entering item master which are marked, has child node - No.

Same way, you can define your customer groups, territories and sales person masters.

In-case of query, drop us a line on support@erpnext.com

Thursday, January 5, 2012

Configuring ERPNext Account

An application is said to be configured completely when you can start making business transactions like orders, invoices, stock transactions etc.

Let us understand the different types of forms which exist in ERPNext:

1. Masters:
    Masters are sets of records which are created once and used in transactions.
    Example: Customer, Supplier, Item, Customer Group, Supplier Type, Territory etc.
    Once the required masters are set, you can proceed with transactions.

2. Transactions:
    Business transactions are the records created based on an event.
    Example:
    Sales order is made when a customer confirms an order.
    Delivery note is made when goods are delivered to a customer.

3. Reports:
    Reports give you an interface to see multiple records of Transactions / Masters on the same screen

    and allow you to export these records in CSV format.


Getting Started:

When you login into your account for the first time, you will be asked to enter the name, abbreviation, fiscal start date and default currency of one of your companies. This creates the first company for your account.

Note: The abbreviation you enter will be appended to various master records, so that it becomes visibly obvious, which master record belongs to which company.


With company creation, your account creation will also be complete. To be able to start with transactions, you can setup your customer, suppliers, items, tax / bank ledgers.

Customer:

To add a new customer, go to:

Selling >> Customer >> Add new customer

OR

Setup >> System >> Import data. Select customer from the list to download template for importing customer master. Learn more about data import functionality here.


Customer categorization: If you want to create customer groups, go to:
Setup >> Selling >> Customer group

If you don't maintain customer group, continue with "default customer group" which be preset in your account.

Accounting ledger of customer:
Customer ledger will be created in chart of accounts (account receivable) as soon as you add or import them.

Supplier:

To add a new supplier, go to:

Buying >> Supplier >> Add new supplier

Or

Setup >> System >> Import data, Select Supplier from the list to download template for importing supplier master.


Supplier Types: If you want to create supplier types, go to:
Setup >> Buying >> Supplier Types

If you don't have supplier type, continue with "default supplier type" which will be preset in your account.

Accounting ledger of supplier:
Supplier ledger will be created in chart of accounts (account payable) as soon as you add or import them.

Item:

To add new item, go to:

Stock >> Item

Or

Setup >> System >> Import data, select item from the list to download template for importing item master. Learn more about import data functionality here.


Customer categorization: If you want to create item groups, go to:
Setup >> Stock >> Item group

If you don't maintain item group, continue with "Default" which will be auto-created.

To import opening stock for items, go to: Stock >> Stock reconciliation. To learn more, click here.

Accounting ledger:

To create new accounting ledger, go to:

Setup >>  Accounts >> Chart of account

1. Click on group under which you want to create ledger.
2. After clicking on folder (group), under which you want to create ledger, a button called
    "Add a child account" will appear below action items (on right side).
3. Enter account name
4. Select group or a ledger. If "group" selected, then it will become folder and you will be able to
    add child ledgers under it. If "Ledger" selected, then only you will be able to select it in
    transactions.

For getting started, you will need to create few accounting ledgers manually for bank, cash and tax accounts. To learn more on creating ledger in chart of account, click here.

To learn updating an opening balance for accounting ledger, click here.

Note: Ledger for customer and supplier will be added in the receivables and payables respectively. You need not add ledger for customer and supplier manually.

Warehouse:

To create new warehouse, go to:

Setup >> Stock >> Warehouse

Once above discussed masters is set, you will be good to go live with transactions like making quotations, orders and invoices.

For any product related help, please drop us a line at support@erpnext.com

Friday, December 23, 2011

Price List to Manage Multiple Currency

Price list is the master to list multiple selling rate (before tax) for the item. To learn uploading pricelist, please click here.

As per the recent update in pricelist, you can list item pricelist in any currency and make sales transactions in any currency.

Let's consider the scenario, where the company XYZ Pvt. Ltd. based in India, has INR as the basic account currency.


Company maintains its item price list in USD as against there company default currency.


Now, when making transaction, say sales order, pricelist will be pulled in USD. But we need to make sales order in INR.


Frappe is the item whos selling price is 1 USD. Now we need to make sales order in INR. So,

Customer currency will be INR only. And as it is also a base currency of application, conversion rate remains 1.

Pricelist currency is USD for frappe. But as we need pricing in INR, we mention conversion factor for USD with respect to INR.


Picture above shows ref rate, rate and amount in currency INR currency for selected item. Its what will be reflected in print format.

Let's consider another scenario where accounts basic currency is INR. Am making items price list in USD and making sales order also in USD.


Ref rate, rate and amount (without * ) is columns for customer currency.

Raf rate*, basic rate* and amount* is column for base currency which is calculated after multiplying price list rate with conversion rate
(34.90 (price list) * 53 (conversion rate) = 1,849.70 INR)

And the most basic scenario where accounts basic currency, price list and customer currency is same.


Both pricelist and custom currency remain same with conversion factor 1.

Broadly speaking, now you can manage pricelist and transactions in any currency possible.

Tuesday, December 20, 2011

Recurring Sales Invoice

Recurring sales invoice is a tool which will re-generate selected invoice automatically and e-mail to selected recipients.

This feature will work for company who raises invoice of same amount to customer in predefined span of time. This scenario is observed followed in business which sell items on lease or loan.

How to enable recurring invoice?

To enable recurring invoice feature in your account, go to:

Setup  >> System >> Feature Setup


How to make invoice recurring?

Once recurring invoice is enabled in feature setup, you will find separate tab of recurring invoice in submitted sales invoices.


Invoice will become recurring once "convert to recurring invoice" field is checked. On checking stated field, few more field will be made visible when user can set property based on which selected invoice will be created in system.


Repeat on day on month:
Considering above screenshot, selected invoice will be re-generated in system on 12th of every month till "convert to recurring invoice" is unchecked or end date arrives.

End date:
Date on which recurring invoice generation will stop.

Notification e-mail address:
E-mail notification of auto-generated invoice will be sent to  email id's mentioned in notification address field. Customer contact selected above will be pulled automatically in notification field.

Friday, December 16, 2011

E-mail Digest

E-mail digest is a tool to receive auto-generated e-mail report for transactions done in your account.

How to configure e-mail digest?


Enable e-mail digest:

You do all the e-mail digest configuration but if enable is not checked, e-mail wont be triggered to people selected.


Select company, set frequency for auto-generated report and select recipients:


You can set e-mail digest for each company separately.

Email digest can be set for daily, weekly and monthly. System will trigger email report to recipients selected from list.

What is e-mailed to recipients?

E-mail digest will be generated for the items which are checked from list of items.


Sample report:


Tuesday, December 13, 2011

Customize Form View

Let us understand the ERPNext architecture before we venture to learn form customization tool.

ERPNext is built over WNframework. In this framework, each form is created as a table in the backend. Each table has field and properties are assigned to each field.

Like Sales order is a table, in which sales order fields are defined in rows as "Sales order series" and "customer name". Each of these field has properties like "label", "mandatory", "print hide" etc.

Sales order table:

Field label Mandatory Print Hide In Filter
Sales order Series Series (Check box) (Check box) (Check box)
Customer Name Customer (Check box) (Check box) (Check box)

To store more details of sales order like item detail, we have separate table called "sales order item" table. Likewise, taxes are the separate table in sales order. So, for sales order form, sales order table becomes parent and sales order item, taxes and sales person becomes child table.

Please find below the table structure of each form type.
Transaction Table Table Name
Quotation Quotation Quotation

Quotation item table Quotation Item
Sales Order Sales order Sales Order

Sales order item table Sales Order Item
Delivery Note Delivery note Delivery Note

Delivery note item table Delivery Note Item
Sales Invoice sales invoice Sales Invoice

Sales invoice item table
Sales Invoice Item

Sales invoice tax table Sales Taxes and Charges
Purchase Order Purchase order Purchase Order

Purchase order item table
Purchase Order Item
Purchase Receipt Purchase receipt Purchase Receipt

Purchase receipt item table Purchase Receipt Item
Purchase Invoice Purchase invoice Purchase Invoice

Purchase invoice item table
Purchase Invoice Item

Purchase invoice tax table Purchase Taxes and Charges
Journal Voucher Journal voucher Journal Voucher

Journal voucher item table Journal Voucher Detail

With this, lets dive into the form customization tool. "Customize form view" is the tool which allows us to select a table and modify fields property as per your requirement.
You can find customize form view by going to:
Modules --> Setup --> Customize form view


Lets' say I want to make item code field mandatory in sales invoice - item table. What will I select in form type?

1. Form type - RV detail (refer to above table for clarification)
2. Selecting form will pull columns of invoice item table (as row here)
3. To make item code mandatory, select check req. for item code and update.
You will need to do clear cache (from tools --> clear cache) and browser refresh to see the effect in the form.


Please refer to table below to learn about field property.

Field property Purpose Field Type
Allow on submit Lets user update value in field even after submission. Check box
Default Value defined in default will be pulled on new record creation Text box
Description Gives field description for user understanding Text box
Hidden Will hide field in form Check box
In Filter Will add this field in report Check box
Label Label is the name defined for field which appears in form Text box
Options Make field drop down selecting Text box
Print hide Will hide this field in print Check box
Reqd (Required) Will make that field mandatory Check box