Showing posts with label accounts. Show all posts

Monday, July 2, 2012

How to Use Payment Reconciliation Tool?

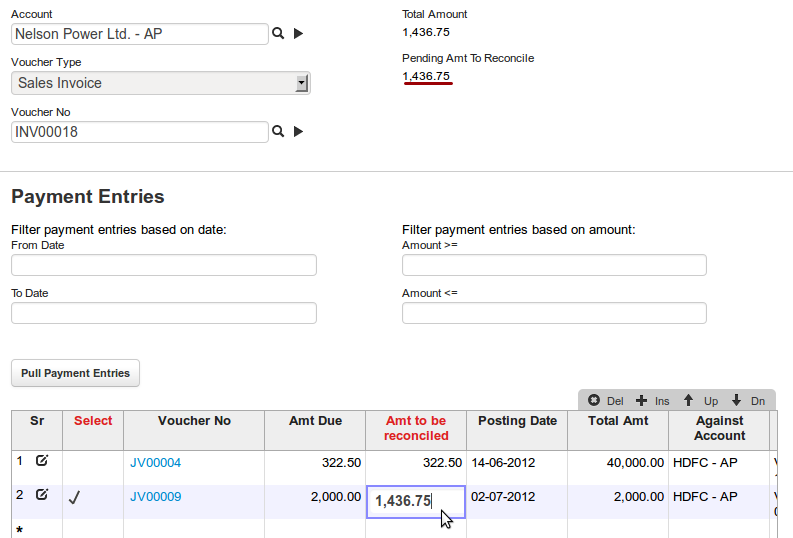
Payment reconciliation is a tool to define the invoice in unadjusted payment entries (journal voucher). Let's consider an scenario to understand this query.


Looking at above given screen-shot, we can try and learn how payment reconciliation works.

INV00018 is the sales invoice worth 1,436.75. There has been no payment entry against invoice hence its 100% invoice is outstanding.

Table below has pulled up all the unadjusted payment entries with amount still not reconciled against any invoice. To reconcile the said amount against invoice INV00018, they will need to check box against JV and click on “Reconcile” button.

Clicking on reconcile  button will update invoice no. in unadjusted journal voucher.


Thanks,
ERPNext Team
www.erpnext.com

Monday, May 14, 2012

Account Payable & Receivable Reports

The accounts payable report provides detail of the money owed by the business in due format. The total amount owed per supplier  per invoice is provided. Also, you can set aging in report like amount to be paid in next 0-30 days, 30-60 days etc.

The accounts receivable report gives you a detailed listing of the balance due over customer per invoice. This helps company follow customer for pending payment against specific invoices.

To check these report in erpnext, go to:

Account >> Report >> Account payable / receivable reports


What are filters for?

Using date and accounts filter you can filter invoice made between specified time for particular customer / supplier.


-- For more queries, write us on support@erpnext.com --

Monday, January 30, 2012

How to Use Tax Inclusive Rate Functionality in ERPNext?

Tax inclusive rate functionality allows user to enter tax inclusive rate  items rate table.

As per the standard, user has to enter items rate before tax in pricelist which is fetched in items ref rate.


But for company into retail business, users only know tax inclusive rate of an item. They can use this feature which will back calculate tax and ref rate for them.


To back calculate taxes from tax inclusive rate, you will need to:

1. Mention taxes applicable on item level.
2. Tax inclusive rate in rate / basic rate column on item level.
3. Mention all the possible tax ledgers in tax table and check mark "include in print rate".


P.S.:

When need to calculate discount:

When need to offer discount to customer, mention tax inclusive rate in ref rate instead of basic rate.

Thursday, January 5, 2012

Configuring ERPNext Account

An application is said to be configured completely when you can start making business transactions like orders, invoices, stock transactions etc.

Let us understand the different types of forms which exist in ERPNext:

1. Masters:
    Masters are sets of records which are created once and used in transactions.
    Example: Customer, Supplier, Item, Customer Group, Supplier Type, Territory etc.
    Once the required masters are set, you can proceed with transactions.

2. Transactions:
    Business transactions are the records created based on an event.
    Example:
    Sales order is made when a customer confirms an order.
    Delivery note is made when goods are delivered to a customer.

3. Reports:
    Reports give you an interface to see multiple records of Transactions / Masters on the same screen

    and allow you to export these records in CSV format.


Getting Started:

When you login into your account for the first time, you will be asked to enter the name, abbreviation, fiscal start date and default currency of one of your companies. This creates the first company for your account.

Note: The abbreviation you enter will be appended to various master records, so that it becomes visibly obvious, which master record belongs to which company.


With company creation, your account creation will also be complete. To be able to start with transactions, you can setup your customer, suppliers, items, tax / bank ledgers.

Customer:

To add a new customer, go to:

Selling >> Customer >> Add new customer

OR

Setup >> System >> Import data. Select customer from the list to download template for importing customer master. Learn more about data import functionality here.


Customer categorization: If you want to create customer groups, go to:
Setup >> Selling >> Customer group

If you don't maintain customer group, continue with "default customer group" which be preset in your account.

Accounting ledger of customer:
Customer ledger will be created in chart of accounts (account receivable) as soon as you add or import them.

Supplier:

To add a new supplier, go to:

Buying >> Supplier >> Add new supplier

Or

Setup >> System >> Import data, Select Supplier from the list to download template for importing supplier master.


Supplier Types: If you want to create supplier types, go to:
Setup >> Buying >> Supplier Types

If you don't have supplier type, continue with "default supplier type" which will be preset in your account.

Accounting ledger of supplier:
Supplier ledger will be created in chart of accounts (account payable) as soon as you add or import them.

Item:

To add new item, go to:

Stock >> Item

Or

Setup >> System >> Import data, select item from the list to download template for importing item master. Learn more about import data functionality here.


Customer categorization: If you want to create item groups, go to:
Setup >> Stock >> Item group

If you don't maintain item group, continue with "Default" which will be auto-created.

To import opening stock for items, go to: Stock >> Stock reconciliation. To learn more, click here.

Accounting ledger:

To create new accounting ledger, go to:

Setup >>  Accounts >> Chart of account

1. Click on group under which you want to create ledger.
2. After clicking on folder (group), under which you want to create ledger, a button called
    "Add a child account" will appear below action items (on right side).
3. Enter account name
4. Select group or a ledger. If "group" selected, then it will become folder and you will be able to
    add child ledgers under it. If "Ledger" selected, then only you will be able to select it in
    transactions.

For getting started, you will need to create few accounting ledgers manually for bank, cash and tax accounts. To learn more on creating ledger in chart of account, click here.

To learn updating an opening balance for accounting ledger, click here.

Note: Ledger for customer and supplier will be added in the receivables and payables respectively. You need not add ledger for customer and supplier manually.

Warehouse:

To create new warehouse, go to:

Setup >> Stock >> Warehouse

Once above discussed masters is set, you will be good to go live with transactions like making quotations, orders and invoices.

For any product related help, please drop us a line at support@erpnext.com

Tuesday, December 20, 2011

Recurring Sales Invoice

Recurring sales invoice is a tool which will re-generate selected invoice automatically and e-mail to selected recipients.

This feature will work for company who raises invoice of same amount to customer in predefined span of time. This scenario is observed followed in business which sell items on lease or loan.

How to enable recurring invoice?

To enable recurring invoice feature in your account, go to:

Setup  >> System >> Feature Setup


How to make invoice recurring?

Once recurring invoice is enabled in feature setup, you will find separate tab of recurring invoice in submitted sales invoices.


Invoice will become recurring once "convert to recurring invoice" field is checked. On checking stated field, few more field will be made visible when user can set property based on which selected invoice will be created in system.


Repeat on day on month:
Considering above screenshot, selected invoice will be re-generated in system on 12th of every month till "convert to recurring invoice" is unchecked or end date arrives.

End date:
Date on which recurring invoice generation will stop.

Notification e-mail address:
E-mail notification of auto-generated invoice will be sent to  email id's mentioned in notification address field. Customer contact selected above will be pulled automatically in notification field.

Friday, September 2, 2011

Multi Currency in ERPNext

Multi currency functionality allows user to maintain price list and making transaction in multiple currency.

A user can define default currency for each company in ERPNext application. For example, you could have 3 companies in your single ERPNext account with different default currency.


Multi-currency transactions possible in transactions:
1. Selling : Quotation, sales order
2. Purchase: Purchase order
3. Stock: delivery note, purchase receipt
4, Accounts: Sales invoice, purchase invoice, journal voucher

When you are making transaction for Test company then INR will be fetched as default with conversion factor as 1.


If i want to make an invoice in currency other than my default currency, then i will select that currency and define conversion rate between select and my default currency.


After selecting currency and mentioning conversion rate, one can select items and put ref rate for respective items.

In items table below you will find columns with duplicate labels like:
Ref rate (for rate in def. currency)
Ref rate* (for rate other then def. currency)

Basic rate (basic rate in def. currency)
Basic rate* (basic rate in other currency selected)

Amount (amount in def. currency)
Amount* (amount in other currency selected)


Note: No columns of other currency will be editable except basic rate* where user can put discounted amount and discount rate will be calculated automatically.

After saving invoice that's how your transaction will look like:


All ledger posting will be done in default currencies. For example, if you have a bank account of currency USD, even if you do invoicing in INR or any other currency but payment entry would be done  in default currency only. Bank ledger will show balance in USD which is default currency for that company.

Thursday, July 21, 2011

How to Change Ledger Setting?

To change ledger property, go to:

1. Setup --> Accounts --> Chart of accounts --> Click on ledger or
2. Accounts --> Tools --> Chart of accounts --> Click on ledger to edit


Step 2:
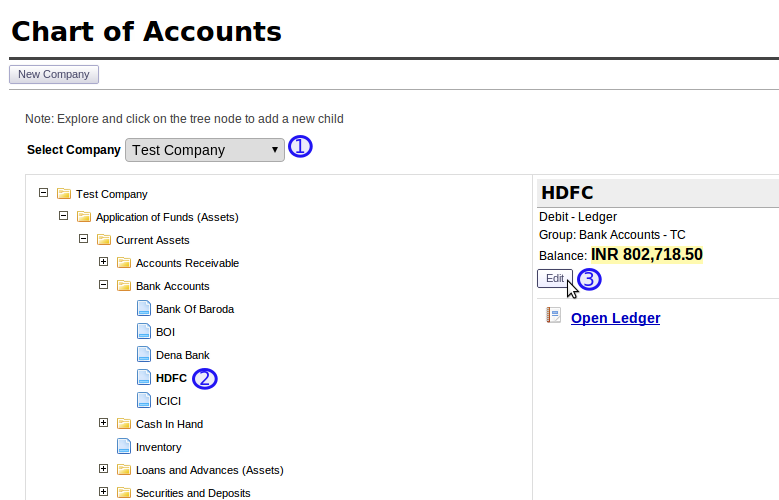
Select ledger to be edited 


Click on edit button to see property of ledger.

Below is the screenshot of ledger properties. From here you can:
1. Select / change parent groups of a ledger
2. Change ledger into group and vice-versa
3. Select account type
4. Select master type

Thursday, March 24, 2011

How to Enter Advance Payment Received in ERPNext?

You can receive advance payments from a customer by creating a journal entry as shown below and later adjust this against multiple invoices raised against the customer.

To create an advance receipt entry go to
Accounts-->Journal Voucher and click on the "New Journal Voucher" button


Select the voucher type.


 Enter the customer account and the bank account where you will deposit the cheque.


Select Is Advance as "Yes"


Click on the "Save" button. You can still edit the voucher. To confirm the entry click on the "Submit" button as shown below. Once submitted the advance will be credited to the customer account.


Now in future you can adjust this advance against any Sales Invoice raised to the customer as shown below.
While creating the Sales Invoice select the customer, scroll down to the "Advances" section and click on the "Get Advance Received" button.


This will fetch all the voucher nos and the advance amount paid by the customer which is not adjusted against any sales invoice. Enter the amount you want to adjust against the current invoice.


This will adjust the outstanding of the invoice as shown below.


In similar manner you can create multiple advance vouchers and adjust against multiple invoices.

For more information: http://www.erpnext.com


Tuesday, March 15, 2011

How to Create Custom Fields in ERPNext?

You can create custom fields in any transaction and make them available in print formats and reports.

To create a custom field go to Setup-->System-->Custom Field


Click the "New Custom Field" button.


Enter the details as shown below


Click on the Save button. A unique number will be generated for the custom field. On saving the new field will be added in all the new transactions of the corresponding document. Please refresh the system once before creating a new transaction.


For more information and free trial visit http://www.erpnext.com


Wednesday, March 9, 2011

How to Create a Debit Note in ERPNext ?

You can create a Debit Note against a Purchase Return.

To know how to use the Purchase Return Wizard visit
http://erpnext.blogspot.com/2011/03/how-to-manage-purchase-return-in.html

To create a Debit Note directly , follow steps as shown below


A new Journal Voucher will open up. Debit the amount against the supplier account head and credit the same amount against an Expense account.


Save and Submit the Journal Voucher as shown below.


For more details, please visit www.erpnext.com

Thursday, February 24, 2011

Getting Started with ERPNext Account

ERPNext is a web based system which can help you manage your complete business in a smarter way to help you grow your business.

It has following modules which are completed integrated
  1. Selling (including CRM)
  2. Buying
  3. Stocks
  4. Accounting
  5. Support
  6. Projects
  7. HR
  8. Production
Follow the below links to get started with your ERPNext account

  1. Sign-up  for a FREE ERPNext trial account
  2. How to Add New Users and Assign Roles in Your ERPNext Account?
  3. How to upload letterhead?
  4. How to manage customers and contacts?
  5. How to manage suppliers and contacts?
  6. How to create warehouse?
  7. How to create items?
  8. How to import masters using csv file?
  9. How to upload price list?
  10. How to upload opening stock?
  11. How to manage chart of accounts?
  12. How to create opening accounting entries?
  13. How to create templates for terms and conditions?
  14. How to create templates for taxes and other charges for sales transactions?
  15. How to create templates for taxes and other charges for purchase transactions?
  16. How to create/add/edit naming series for transactions?
You can contact our support team at:
  1. Live Chat Support
  2. Skype: iwebnotes
  3. Phone: +91 22 65265364 / 22 65100278
  4. Email: support@erpnext.com

We are eager to hear from you and help you grow your business by providing a good quality affordable software.

Cheers
Team EPRNext


    Friday, February 18, 2011

    How to Manage Customers and Contacts?

    You can create Customer master in ERPNext in 2 ways :

    1. Directly create a Customer
    2. Convert Lead to Customer

    Directly creating a Customer
    To directly create a customer follow the steps as shown in the figure.


    The customer master will have tabs as shown below. We will have a look at each tab in detail.


    The Basic Info tab in customer will capture the general details of a customer.

    The Customer Type field will have two values - Company and Individual. Select Individual if your customer is an individual person and mention his phone number. This helps in updating the contact master automatically on save. If the customer is a company, you can maintain a list of contacts in Contact Details tab on save.

    You can categorize your customers into different customer groups and territories which will help you in better analysis.

    Save the customer master. This will also create an account head for the customer in Chart of Accounts automatically.

     The customer master will be saved by the customer name by default. You can save the customer by customer codes as well. For this go to Setup --> Global Defaults --> Selling and select Naming Series in "Customer Created By" field. Refresh the system.


    The Contact Details tab will have a list of contacts for the customer. Click on the Add Contact button to add more contacts.

     The following screen will appear in a box asking you for details of the contact. Save the contact.


    The More Info tab will capture the credit days and credit limit of the customer. If the total outstanding balance exceeds the number of credit days or the due date exceeds the number of credit days, the system will not permit further transactions unless the customer payment is recorded in the Journal Voucher. However, the transactions can be unlocked by the Credit Controller specified in Global Defaults.


    The Sales Team tab will capture the sales persons who will be dealing with this customer. If you are dealing with the customer through a partner, mention so in Default Sales Partner. These details will be fetched in sales transactions when this customer is selected.


    The Transaction History tab will capture a list of Quotations, Sales Orders, Delivery Notes and Sales Invoices made for this Customer.


    Converting Lead to Customer

    Open an existing Lead and click on Create Customer button as shown below.


    For free trial, please visit www.erpnext.com