Showing posts with label delivery note. Show all posts

Monday, July 2, 2012

How to Use Payment Reconciliation Tool?

Payment reconciliation is a tool to define the invoice in unadjusted payment entries (journal voucher). Let's consider an scenario to understand this query.
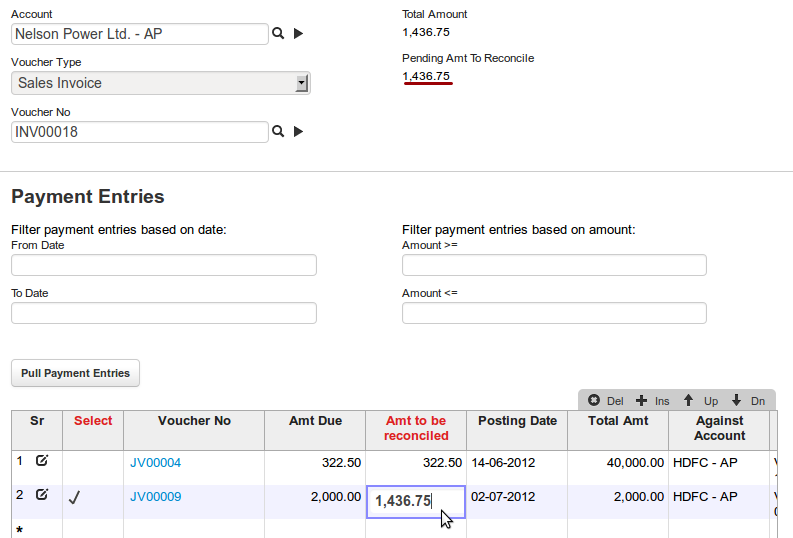


Looking at above given screen-shot, we can try and learn how payment reconciliation works.

INV00018 is the sales invoice worth 1,436.75. There has been no payment entry against invoice hence its 100% invoice is outstanding.

Table below has pulled up all the unadjusted payment entries with amount still not reconciled against any invoice. To reconcile the said amount against invoice INV00018, they will need to check box against JV and click on “Reconcile” button.

Clicking on reconcile  button will update invoice no. in unadjusted journal voucher.


Thanks,
ERPNext Team
www.erpnext.com

Monday, February 28, 2011

How to Create Delivery Notes in ERPNext?

Delivery Note can be created from a Sales Order. However to create a Delivery Note directly, follow steps as shown below.


The Delivery Notes will have the following tabs. Lets have a look at each tab in detail.


The Basic Info tab will capture details related to the customer and the posting date on which the stock ledger entries will be affected. You can mention the lorry and challan details as well.


The Items tab will have a list of items and their quantities to be delivered from a warehouse. You can create a Delivery Note against multiple Sales Orders.


The Ref rate will get fetched from the item master on selection of price list. Changes can be made to the Rate which will calculate the Discount(%) on Ref Rate. The below rate and amount are in customer's currency.


Mention the warehouse from where goods will be delivered so that the stock level gets reduced from that warehouse on submitting Delivery Note. Mention Serial Nos and Batch Nos if applicable to the item. Serial numbers can be separated by a comma.


The Taxes tab will capture the total tax amount. If you have not created a tax template, enter taxes directly. You can select Type based on the following requirements :

  1. Actual - when you know the actual amount of tax or other charge to be added to the net total, mention the amount in the Rate column.
  2. On Net Total - will be selected when a tax percentage has to be calculated on the net total.
  3. On Previous Row Amount - will be selected if a tax percentage needs to be calculated over the previous row tax amount . In this case mention the Row Id.
  4. On Previous Row Total - will be selected when a tax percentage needs to be calculated over the total of net total and the previous row tax amount. In this case also mention the Row Id

Select the relevant tax account head applicable. The account head should be created under Chart of Accounts. The tax rate will be mentioned in the account head and will get fetched under the Rate column on selecting the same. 

Creating a tax template will save your time. To see how to create a tax template click on the link http://erpnext.blogspot.com/2011/02/how-to-create-template-for-taxes-and.html


The Terms tab will have the terms and conditions and other additional information which you would want to appear on the Sales Order print format. You can even create a template pull its details. To create a template click on the link http://erpnext.blogspot.com/2011/02/how-to-create-templates-for-terms-and.html


The More Info tab will capture additional information.


The Sales Team will capture the details of the Sales Partner and Sales Persons involved in the sales process and their commission and allocated percentage. The sales team is captured even in the Customer master and can be fetched from there once the customer is selected in the Sales Order.


Now save and submit the Delivery Note. 


Submitting the Delivery Note reduce the stock quantity from the warehouse selected. Also you can email and print the Delivery Note. 

Sales Invoice can now be made against the Delivery Note to book your income.


For more details, please visit www.erpnext.com

Thursday, February 24, 2011

How to Import Masters into ERPNext?

You can import all your masters like items, customers, suppliers, pricelist, warehouse using csv files in ERPNext.


Few standard to be followed when importing data:

  •   Template downloaded from ERPNext account should be followed
  •   Spreadsheet should be saved in .cvs format
  •   Header and column name in template cannot be edited (first 4 rows)
  •   Link field (like item group and warehouse) should be already present in system.

Below you can see how to import a item master.

Go to: Setup --> Import Data


Download the template of the master you want to import. For item master select "Item"


Checking download with data will pull existing data of selected record in excel template. This can be helpful for user to understand as what value to enter in which column.
You will get a list of templates of item master and all child masters inside the item. You need to select the "Item" link to download the template for the item master.
Download and open the template in a spreadsheet as shown below. Add the details in the template. Do not change the row or column positions of the headers. You can enter each item in a new row. You need to fill in all the mandatory fields.


For item master you need to first create the required
1. UOM: Unit of Measurement (Eg: Nos. Kgs. Litres etc.)

2. Item Groups: You can create multiple item groups to categorise your items. There is a "Default" group already created in the system To start with you can upload using a default group and change it later as and when required.

To manage item groups refer to http://erpnext.blogspot.com/2011/02/how-to-create-item-group.html


Save this file as ".csv". In the import data page click on "Browse", select the saved ".csv" file and click on Import.


On importing you can see a log of the imported items on the right hand side as shown below. If there is any error it will be mentioned with the specific row and column number where the error exist.  


In similar manner you can upload customer, supplier and other masters
For more information visit http://www.erpnext.com


Monday, February 21, 2011

How to Create Suppliers and Contacts in ERPNext?

To create a Supplier follow the steps as shown below.


The supplier master will have tabs as shown below. We will have a look at each tab in detail.


The Supplier Info will have the name of the supplier and address details. You can categorize your suppliers into different types based on your requirement.

Save the supplier master. This will also create an account head for the supplier in Chart of Accounts automatically.

The supplier master will be saved by the supplier name by default. You can save the supplier by supplier codes as well. For this go to :

Setup --> Global Defaults --> Buying and select Naming Series in "Supplier Master Created By" field.

Refresh the system.


The Contact Details tab will have a list of contacts for the supplier. Click on the Add Contact button to add more contacts. Likewise you will be able to add multiple address for that supplier.

The following screen will appear in a box asking you for details of the contact. Save the contact.


You can enter additional information about the Supplier in More Info tab.


The Transaction History tab will capture a list of Purchase Orders, Purchase Receipts and Purchase Invoices made for this Supplier.


Friday, February 18, 2011

How to Create Leads in ERPNext?

To create a lead follow the steps as shown below


The Basic Info tab in the Lead form captures general details of the person, his organization and his contact details. The source of the lead can be website, cold calling, reference etc as shown in the figure. You can rate this lead as Hot, Warm or Cold depending on his interest in the product. A Lead can be a prospective client, consultant or a channel partner which can be specified in the field called Lead Type. Make sure to enter the mobile no and email id if you want to send SMS and email through Lead.


Below basic info about lead, you can capture contact details like communication address, mobile and landline no., email address etc. If you wish to send am SMS from system, ensure that correct mobile no. is provided there.


The More Info tab in Lead form will have some additional information related to the sales person who has to follow up the lead on some date to discuss anything. This information will appear on the sales person's home page as a calendar event on the follow up date. You can also mention the industry and the market segment to which this lead belongs to.


The Communication History tab will record follow up history with the lead. The name of the sales person and the type of follow up will also be captured. You can later run a report on this table to see which sales person has followed up whom.


Click on the green colored "Save" button to save your lead.

For free trial, please visit www.erpnext.com