Wednesday, March 16, 2011

How to Manage Tasks in ERPNext ?

You can create tasks and allocate them to your users. These tickets can be linked to a project and the status of the completion of each task can be tracked. To create a task follow the steps as shown below.


The Task Details will capture the subject of the task and by whom it is raised.

Mention the user name to whom this task is to be assigned in the Allocated To field. You can allocate tasks only to those employees whose login ids are created in the system.

The Status will be Open when the the task is created.

Select the relevant Project Name from project master to which this task belongs to.


The Time and Budget details will capture the expected and actual start date and end date of the task.


Save the task.


When the task has been finished, the user to whom the task had been allocated can click on Get Approval as shown below. The Status will be changed to Pending Review.


The user who had raised the ticket can close it after verifying by changing the status to Closed as shown below and then save the task.


For more details, please visit www.erpnext.com

Tuesday, March 15, 2011

How to Create Custom Fields in ERPNext?

You can create custom fields in any transaction and make them available in print formats and reports.

To create a custom field go to Setup-->System-->Custom Field


Click the "New Custom Field" button.


Enter the details as shown below


Click on the Save button. A unique number will be generated for the custom field. On saving the new field will be added in all the new transactions of the corresponding document. Please refresh the system once before creating a new transaction.


For more information and free trial visit http://www.erpnext.com


How to Create Salary Structure in ERPNext?

Salary structure will be created for each employee in the company. Salary structure is where employee's earnings and deductions are defined.

To create new salary structure, go to:
HR --> Salary structure --> New Salary structure.
Click on "New salary structure"


Step 1: Select an employee from employee master for whom you want to create the salary structure.


Step 2: Mark status of an salary structure as "Yes" or "No".
If marked Yes - System will consider that salary structure for processing salary slip of an employee
If marked No - System wont consider that salary structure for processing salary slip.

Also mention yearly package offered to employee in CTC (cost to company).

Step 3:
Earning and Deduction:
All the earning and deduction heads created in your account will be pulled in salary structure.
1. Keep only required earning and deduction head required for that employee.
2. Mention amount in front of each earning and deduction type.
    Note: No need to mention income tax and leave deduction if creating IT checklist for the employee.
3. LWP = Leave without pay
    Only earning head for whom "Depend on LWP" is marked will be affected when employee takes "leave
    without pay".


Net Pay = total earning - total deduction

Save the Salary Structure.


Now you can create a Salary Slip and IT Checklist against this Salary Structure.


For more details, please visit www.erpnext.com

How to Create an Employee Master in ERPNext ?

To create an employee master, follow steps as shown below


The Basic Information will capture the name of the employee, status (Active /  Left), date of joining etc. Select the relevant Holiday List applicable to the Employee. If this Employee is taking leaves and a date mentioned in the holiday list falls in that period, that date would not be deducted from his leave balance.


The Employee codes can be generated by either Naming Series followed by a system generated number or Employee Number.This setting can be done from Setup --> System --> Global Defaults --> HR.


The tab for Job Profile will capture the branch, designation and department of the Employee. These details will be fetched from their respective masters.

Salary related information will also be covered like the mode of salary payment which can be Bank, Cash or Cheque. If Bank, then mention the Bank Name and the Bank Account number of the employee.


The Contact Details will have the phone number, email and address details of the employee.


The Personal Details will capture family background, health and passport details.


The Educational Qualification tab will capture the details qualifications acquired by the employee, the university and percentage of marks obtained.


The Career History will capture details of work experience in previous companies as well as the current company.


The Exit tab will be filled when the employee is leaving.


You can attach the Employee's resume (CV) or Photo in the Attachments tab.


Now save the Employee.


For more details, please visit www.erpnext.com

How to Upload Attendance Records in ERPNext?


To Upload the attendance for multiple employees for multiple days 
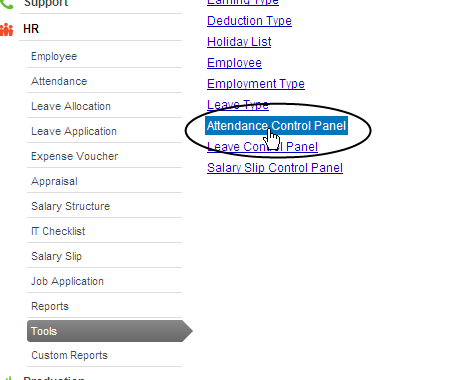
Go to HR-->Tools-->Attendance Control Panel


Select the from date and to date for which you want to mark the attendance and
click on the "Get Template" button.


You can open the template using in a spreadsheet (ms excel, openoffice etc.)  as below. The template will have a list of all the employees for all the dates you have selected above. You only need to enter the attendance "Status" as "Present" "Absent" or "Half Day". Save this file as ".csv"


Upload the above file as below:


Now click on the "Import" button to update the attendance as shown below.


You will also be able to see the Import Log once the attendance data is imported.


How to check the Attendance Report?
Go to HR-->Reports-->Monthly Attendance Report


Hope this helps to update attendance records and take out reports from ERPNext.
For more information and sign up for a trial visit http://www.erpnext.com

Monday, March 14, 2011

How to Configure Purchase Settings in Item Master ERPNext?

Item --> Purchase Detail Section

Item with "Is Purchase Item" as "Yes" can be used in purchase transactions like indent, purchase order, purchase receipt and purchase invoice.You wont be able to consider item which are marked as "purchase item - No' in above stated transactions.

How to purchase items in multiple unit of measurement (UoM)?
Let us consider the scenario where default UoM of an item is Nos. This means the inventory in maintained in Nos. Suppose you purchase the same item in both Nos and Kgs. In the UoM table you can define if the item is purchased in Kgs its conversion factor 5. This means 1 kg of item is equal to 5 Nos. This will update the inventory accordingly. Similarly you can define multiple UoMs.

What is default expense account?
You can select a default expense account which will be fetched automatically when you select this item in purchase invoice.

What is standard rate?
Standard rate of an item is considered for production Bill of Material. Cost of production item is calculated based on cost of material required.
You can have the finished product costing where the particular item is used in 2 ways
1. Last purchase cost (which will keep of changing)
2. Standard cost


How to Create Deduction Type for Salary Slips in ERPNext?

Deduction type are all possible deduction heads for employee salary structure.
Eg: income tax, rofessional tax, ESIC, LWP (Leaves without pay).. etc.

To create new deduction type, go to Setup-->HR-->Deduction type


Click on "New Deduction Type" button


Enter the name, description and click the "Save" button. 


You can use this deduction types to create salary structure for each employee.

For more information and free trial visit http://www.erpnext.com

How to Create Earning Type for Salary Slips in ERPNext?

Earning type is a list of all earning heads used to create salary structures for employees.
Eg: basic salary, dearness allowance, house rent allowance, over time etc...

To create new earning type, got to HR >> Salary and payroll >> Earning Type.


Click on the "New Earning Type" button.


Enter the earning type, whether it is taxable or not and click the "Save" button.


You can select these earning types while creating salary structures.

For more information and free trial please visit http://www.erpnext.com

How to Check Stock Levels in ERPNext?

You can check real time stock available across multiple locations in terms of

  • Reserved Quantity - quantity for which orders are received but not delivered.
  • Actual Quantity-  actual physical stock lying in the warehouse
  • Ordered Quantity- quantity for which purchase orders are raised but not items are not received yet
  • Planned Qty- quantity planned in the production orders
  • Indented Quantity- quantiy for which indents are raised but purchase orders are not.
  • Valuation Rate- fifo or moving average rate for the item 
  • Projected Qty = actual+ordered+planned+indented-reserved

To check your stock level, go to Stock --> Reports --> Stock level


To check for a specific item available in particular warehouse use the available filters.


For more information and sign up for a free trial please visit http://www.erpnext.com