Showing posts with label ledger. Show all posts

Tuesday, January 17, 2012

How to Create Item Groups?

Masters like item group, customer group, territory, sales person are in tree structure.

To create new item group, go to:

Module >> Stock >> Item group


To create new item group click on "New item group".


When click on new item group, it will ask for item group name and parent under which you want to create this item group.


Parent: Parent is the group under item group tree, under which "test item group" will be located.

What is the meaning of has child node?

Has child node field has two options, Yes or No. 

If "yes" selected for item group, it will be added as folder under item group. Item group with child no - yes will be able in parent field while creating item code.

If "no" selected for item group, it will be created as ledger and will be available for selection in item master.


You will be able to select item groups while entering item master which are marked, has child node - No.

Same way, you can define your customer groups, territories and sales person masters.

In-case of query, drop us a line on support@erpnext.com

Friday, December 16, 2011

E-mail Digest

E-mail digest is a tool to receive auto-generated e-mail report for transactions done in your account.

How to configure e-mail digest?


Enable e-mail digest:

You do all the e-mail digest configuration but if enable is not checked, e-mail wont be triggered to people selected.


Select company, set frequency for auto-generated report and select recipients:


You can set e-mail digest for each company separately.

Email digest can be set for daily, weekly and monthly. System will trigger email report to recipients selected from list.

What is e-mailed to recipients?

E-mail digest will be generated for the items which are checked from list of items.


Sample report:


Friday, September 2, 2011

Multi Currency in ERPNext

Multi currency functionality allows user to maintain price list and making transaction in multiple currency.

A user can define default currency for each company in ERPNext application. For example, you could have 3 companies in your single ERPNext account with different default currency.


Multi-currency transactions possible in transactions:
1. Selling : Quotation, sales order
2. Purchase: Purchase order
3. Stock: delivery note, purchase receipt
4, Accounts: Sales invoice, purchase invoice, journal voucher

When you are making transaction for Test company then INR will be fetched as default with conversion factor as 1.


If i want to make an invoice in currency other than my default currency, then i will select that currency and define conversion rate between select and my default currency.


After selecting currency and mentioning conversion rate, one can select items and put ref rate for respective items.

In items table below you will find columns with duplicate labels like:
Ref rate (for rate in def. currency)
Ref rate* (for rate other then def. currency)

Basic rate (basic rate in def. currency)
Basic rate* (basic rate in other currency selected)

Amount (amount in def. currency)
Amount* (amount in other currency selected)


Note: No columns of other currency will be editable except basic rate* where user can put discounted amount and discount rate will be calculated automatically.

After saving invoice that's how your transaction will look like:


All ledger posting will be done in default currencies. For example, if you have a bank account of currency USD, even if you do invoicing in INR or any other currency but payment entry would be done  in default currency only. Bank ledger will show balance in USD which is default currency for that company.

Thursday, July 21, 2011

How to Change Ledger Setting?

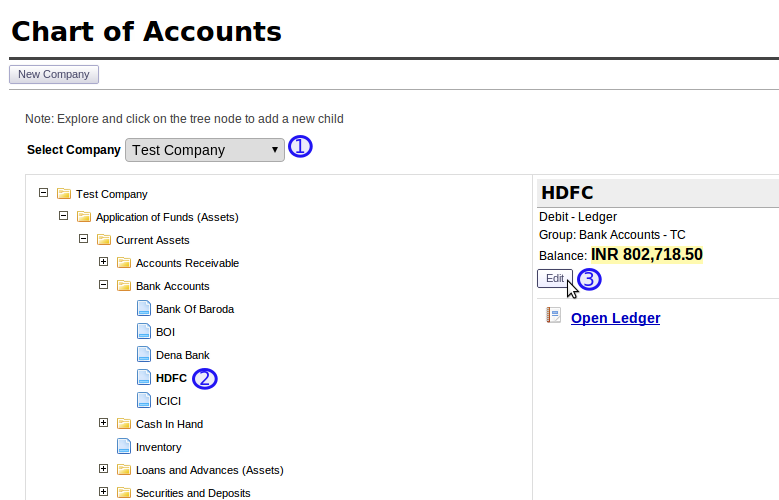
To change ledger property, go to:

1. Setup --> Accounts --> Chart of accounts --> Click on ledger or
2. Accounts --> Tools --> Chart of accounts --> Click on ledger to edit


Step 2:
Select ledger to be edited 


Click on edit button to see property of ledger.

Below is the screenshot of ledger properties. From here you can:
1. Select / change parent groups of a ledger
2. Change ledger into group and vice-versa
3. Select account type
4. Select master type

Wednesday, March 9, 2011

How to Create a Debit Note in ERPNext ?

You can create a Debit Note against a Purchase Return.

To know how to use the Purchase Return Wizard visit
http://erpnext.blogspot.com/2011/03/how-to-manage-purchase-return-in.html

To create a Debit Note directly , follow steps as shown below


A new Journal Voucher will open up. Debit the amount against the supplier account head and credit the same amount against an Expense account.


Save and Submit the Journal Voucher as shown below.


For more details, please visit www.erpnext.com

Monday, February 21, 2011

How to Create an Item in ERPNext?

ERPNext lets you manage all items that you purchase, manufacture, sell or keep in inventory. 
For each item, you can enter the data related to purchase, sales, production, inventory, accounts, and services.  You can also upload the item master. Click here to understand how to import item master in ERPNext using csv (excel) files.

To add new item, Go To-->Stock-->Item-->New Item


Below screen-shot indicates all the sections under the item master.


You need to enter the mandatory fields in "red" and click on the "Save" button. There are additional details which you can enter in other sections.


  1. Item will be saved with code mentioned in item code. Item will be identified, searched and fetched with item code. This can be alphanumeric.
  2. Item name will be actual name of an item. This will appear in the print format of various transactions.
  3. Item group is used to categorize items on various criteria. Click on the search icon to select the relevant item group. Click here to learn how to manage item groups.
  4. Item description will also be fetched into transactions like quotation, sales order, indent, purchase order and appear in the print format. 
  5. Description HTML field will be generated after attaching an item image as an attachment, and then clicking on "add image button". If item image attached here, it will be pulled in transactions also.
  6. Multiple brands can be created by clicking on "+" icon. You can select the relevant brand in the item master.


  1. UoM stands for unit of measurement of an item. It's that UoM in which system will maintain stock of this item.
  2. Stock item: If stock stock selected "yes" for an item, system will do stock ledger entries for this item and give stock level report also. If "no" selected (mostly for services items), no stock level for that item.
  3. Valuation method: There are two options for maintain valuation of stock. FIFO (first in - first out) and moving average. Item valuation will be maintained based on option selected here.
  4. Default Warehouse selected here will be fetched in transactions when this item is selected.
  5. Allowance Percentage: User will be allowed to accept and delivery more qty than mentioned ordered qty by allowance percentage mentioned.
  6. Re-order Level: Is the stock level at which order has to be placed with supplier for procurement.
  7. Minimum Order Qty: Is the quantity below which system wont accept purchase order for this item.
  8. Is Asset Item: Is the item for which stock level entry will be done in fixed asset warehouse only.
  9. Has Batch No.: Before stock transactions, you will need to create batches and mentioned the same in receipt and delivery transactions.
  10. Has Serial No.: Each unit of an item received and sold will be assigned a serial no. You can scan serial no. into serial no. field.
  11. Warranty Period: It will be assigned to serial no. from date of invoice.
  12. End of life: After particular date selected in this field, system won't be available for sales and purchase item.


  1. Purchase Item: If selected "yes", it will be available for purchase transactions.
  2. Lead time: Is the time taken for receiving good from day it was ordered. If lead time provided, required by date for an item in purchase requisition will be calculated automatically.
  3. Default Expense Account: If selected, will be fetched in purchase invoice for this item.
  4. Default Cost Center: If selected, will be fetched in purchase invoice for this item.
  5. Buying Cost: Will be updated for item based on purchase transactions.
  6. Last Purchase Rate: Is the rate at the item were purchase last time.
  7. You can purchase item in UoM other than its standard UoM. To maintain stock level, you can select purchase UoM and put conversion rate with respect to stock UoM. For example, item ABC is stored in nos. but purchased in Kgs. And each Kg of purchase gives me 3 nos. of ABC.
    1 Kg = 3
  8. Manufacturer: Here, you can enter items detail like manufacturer and manufacturers part no.
  9. Also, you can maintain suppliers item code.


  1. Is Sales Item: Item marked "is sales item - Yes" will be available for selection in transactions like quotation, sales order, delivery note and sales invoice. Item marked no won't be available.
  2. Is Service Item: Item marked services item yes will be available for after sales transactions.
  3. Allow samples: System will allow you to make delivery note at zero rate for these items.
  4. Max Discount: You won't be able to offer discount more than mentioned here.
  5. Default Income Account: Income account selected here will be fetched automatically in sales invoice for this item.
  6. Cost Center: Cost center selected here will be fetched automatically in sales invoice for this item.
  7. You can define ref rate (selling rate before taxes) for items in this table. To learn more about pricelist, please click here.
  8. You can track customer code for same item in this table.


In Item Tax table, you can list all the tax ledgers with tax rate applicable in sales and purchase transactions.
Its very important for company to mention tax rate applicable on item here which has different tax rate applicable for items they deal in. If you select item in sales / purchase transaction, with same tax ledger as mentioned above, then you need not mention tax rate for them. It will be pulled from item master only. Or even if you mention tax rate applicable there, it will calculate tax rate on item mentioned here.


If inspection required selected Yes for an item, system will give you notification when making receipt and delivery transactions for this item.


Also, you will be able to make quality inspection report against delivery note and purchase receipt considering parameters mentioned above.


  1. Allow Bill of Material: Select "Yes" for this field if its finished good or sub-assembly. It will allow to make bill of material for this item. If marked no, then you will be able to select it as raw material for other FG or sub-assembly item.
  2. Allow Production Order: As name suggest, select "yes" for item you raise production order in the system.
  3. Is sub-contracted Item: You will be able to do sub-contracting transaction for this item, if selected Yes. To learn more about sub-contracting, click here.


For more information visit http://www.erpnext.com


Friday, February 18, 2011

How to Manage Customers and Contacts?

You can create Customer master in ERPNext in 2 ways :

1. Directly create a Customer
2. Convert Lead to Customer

Directly creating a Customer
To directly create a customer follow the steps as shown in the figure.


The customer master will have tabs as shown below. We will have a look at each tab in detail.


The Basic Info tab in customer will capture the general details of a customer.

The Customer Type field will have two values - Company and Individual. Select Individual if your customer is an individual person and mention his phone number. This helps in updating the contact master automatically on save. If the customer is a company, you can maintain a list of contacts in Contact Details tab on save.

You can categorize your customers into different customer groups and territories which will help you in better analysis.

Save the customer master. This will also create an account head for the customer in Chart of Accounts automatically.

 The customer master will be saved by the customer name by default. You can save the customer by customer codes as well. For this go to Setup --> Global Defaults --> Selling and select Naming Series in "Customer Created By" field. Refresh the system.


The Contact Details tab will have a list of contacts for the customer. Click on the Add Contact button to add more contacts.

 The following screen will appear in a box asking you for details of the contact. Save the contact.


The More Info tab will capture the credit days and credit limit of the customer. If the total outstanding balance exceeds the number of credit days or the due date exceeds the number of credit days, the system will not permit further transactions unless the customer payment is recorded in the Journal Voucher. However, the transactions can be unlocked by the Credit Controller specified in Global Defaults.


The Sales Team tab will capture the sales persons who will be dealing with this customer. If you are dealing with the customer through a partner, mention so in Default Sales Partner. These details will be fetched in sales transactions when this customer is selected.


The Transaction History tab will capture a list of Quotations, Sales Orders, Delivery Notes and Sales Invoices made for this Customer.


Converting Lead to Customer

Open an existing Lead and click on Create Customer button as shown below.


For free trial, please visit www.erpnext.com